Have you ever held a military challenge coin in your hand and marveled at its intricate design, wondering about the story it tells? These small yet powerful tokens are more than just pieces of metal—they are symbols of honor, unity, and achievement. If you’re thinking about designing your own military challenge coin, you’re about to embark on a journey that blends creativity, tradition, and personal meaning. But where do you start? Let’s explore how to transform your ideas into an iconic military challenge coin that will be cherished for years to come.
Military challenge coins have a rich history dating back to World War I, serving as symbols of camaraderie and recognition among service members. Designing your own challenge coin is a unique opportunity to create something that embodies the spirit, values, and stories of your unit or organization. However, the process can seem daunting, especially if you’re new to it. How do you ensure your coin stands out and carries the weight of its intended meaning?
In this guide, we’ll walk you through the steps of designing the perfect military challenge coin, from conceptualizing your ideas to bringing them to life. We’ll address common concerns and provide practical tips to help you create a coin that not only looks impressive but also resonates deeply with those who receive it.
Step 1: Define Your Purpose and Message
Why it’s important: A clear purpose sets the foundation for your coin’s design.
Start by asking yourself what you want your challenge coin to represent. Is it to commemorate a specific event, recognize outstanding service, or foster a sense of unity within your team? Defining the purpose of your coin will guide every aspect of its design, from imagery to text.
Example: If you’re creating a coin to honor a deployment, you might include elements that symbolize the location, mission, and dates of service.
Step 2: Gather Inspiration and Ideas
Why it’s important: Inspiration fuels creativity and helps you brainstorm meaningful design elements.
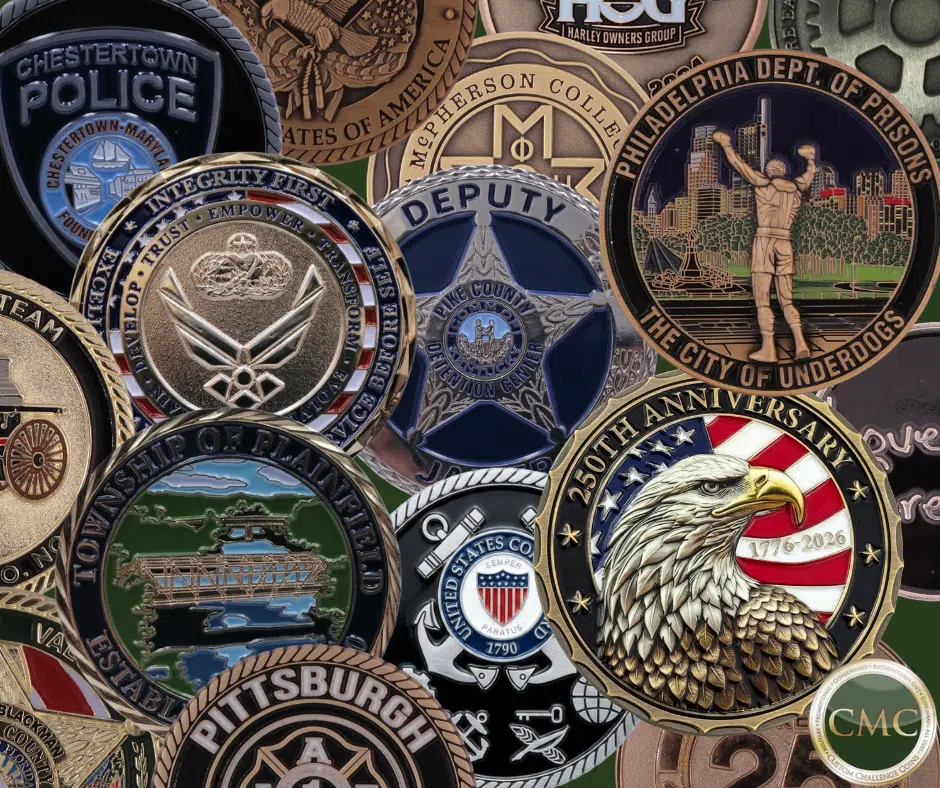
Look at existing challenge coins for inspiration. Pay attention to the symbols, colors, and layouts that catch your eye. Make a list of elements you’d like to incorporate into your design. This can include unit insignias, mottos, dates, and significant symbols.
Example: If you’re designing a coin for a Navy unit, you might be inspired by the imagery of anchors, ships, and waves.
Step 3: Choose a Shape and Size
Why it’s important: The shape and size of your coin affect its overall look and feel.
Challenge coins come in various shapes and sizes. While the traditional round coin is popular, don’t be afraid to consider other shapes like squares, rectangles, or custom outlines that reflect your unit’s identity. Standard sizes range from 1.5 inches to 2 inches in diameter, but you can choose larger or smaller depending on your design needs.
Example: A special forces unit might choose a coin in the shape of a dagger to symbolize their mission.
Step 4: Select Meaningful Imagery and Symbols
Why it’s important: Imagery and symbols communicate the story and values behind your coin.
Incorporate symbols and images that are significant to your unit or organization. This could include emblems, mascots, vehicles, landmarks, or other relevant icons. Ensure that each element adds to the narrative you want to convey.
Example: For a coin commemorating a peacekeeping mission, you might include symbols of peace, such as olive branches or doves, alongside military insignia.
Step 5: Craft a Compelling Motto or Message
Why it’s important: A well-chosen motto or message adds depth and meaning to your coin.
Think about a motto, quote, or message that encapsulates the essence of your coin’s purpose. Keep it concise and impactful. This text can be placed around the edge of the coin or in a prominent location within the design.
Example: A coin celebrating a successful mission might feature the motto, “Strength in Unity” or a quote from a leader who inspired the team.
Step 6: Decide on Colors and Finishes
Why it’s important: Colors and finishes enhance the visual appeal of your coin and make it stand out.
Choose colors that are meaningful and visually striking. Consider the symbolism behind different colors and how they relate to your unit’s identity. Additionally, decide on the type of finish you want, such as antique, polished, or dual-tone.
Example: A coin for an aviation unit might use blue and gold to represent the sky and excellence, with an antique finish to give it a distinguished look.
“I’m Not Artistic—How Can I Design a Coin?”
You don’t have to be an artist to design a great challenge coin. Many professional coin manufacturers offer design assistance and can help bring your ideas to life. Provide them with your concepts and any rough sketches, and they’ll work with you to create a polished, professional design.
Step 7: Create a Prototype
Why it’s important: A prototype allows you to see and feel the coin before final production.
Once you have a design, request a prototype from your manufacturer. This sample coin will help you assess the design’s clarity, color accuracy, and overall feel. Use this opportunity to make any necessary adjustments before the full production run.
Example: If the prototype reveals that certain details are too small to be clearly seen, you can adjust the design to ensure better visibility.
Step 8: Collect Feedback
Why it’s important: Feedback ensures your coin resonates with its intended audience.
Share the prototype with key members of your unit or organization and gather their feedback. Ask for their opinions on the design, colors, and message. Use their input to refine the final product.
Example: If your team suggests adding a specific symbol that has deep meaning for the group, consider incorporating it into the design.
Step 9: Finalize Your Design
Why it’s important: Finalizing the design ensures that every detail is perfect before production.
Review all aspects of the design one last time. Check for spelling errors, ensure all elements are correctly positioned, and confirm that the colors and finishes match your vision. Once you’re satisfied, give the go-ahead for production.
Example: Double-check the placement of text and symbols to ensure they are balanced and visually appealing.
Step 10: Celebrate and Distribute
Why it’s important: Distributing the coins is a moment of pride and recognition.
Plan a special ceremony or event to distribute the coins. Highlight the significance of the design and the story behind it. Present the coins with a sense of honor and appreciation, making the moment memorable for everyone involved.
Example: During the ceremony, share anecdotes about the design process and the meanings of various symbols, reinforcing the coin’s significance.
Designing your own military challenge coin is a rewarding process that allows you to create a lasting symbol of honor and unity. By following these ten steps, you’ll be well on your way to transforming your ideas into an iconic coin that will be cherished by your unit or organization. Remember, the key is to infuse your design with meaning, creativity, and personal significance. You can find high-quality custom military challenge coins here. Happy designing!